I’ve been on sort of a kick playing around with using Voilà to display Jupyter notebooks. Voilà is really slick for displaying the output for a notebook without the code.
I see this as a really powerful way for data science students to communicate their results.
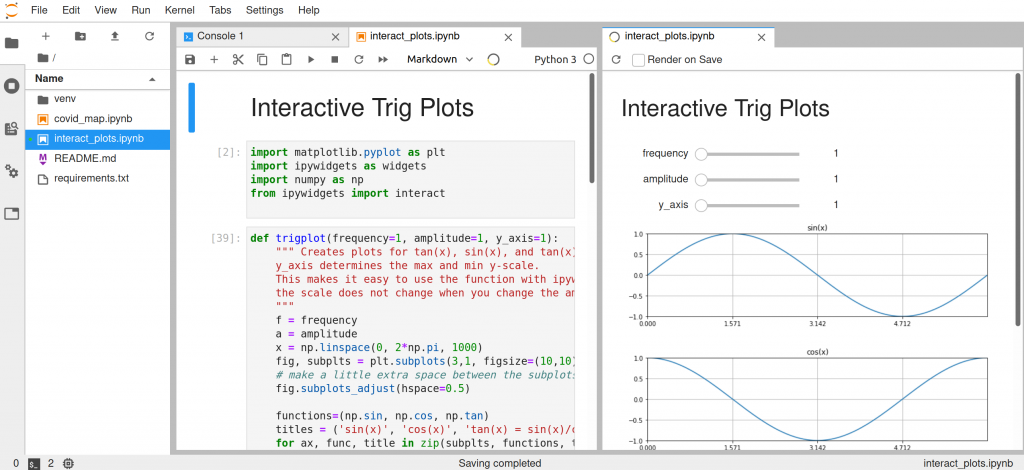
(The code for the notebook above and a second notebook I’ve used for playing around with Voila is available on my Github.)
I thought I’d make some simple instructions on getting setup to use this for development. By which I mean making it so that one can see the notebook rendered in Voilà next to the original notebook in JupyterLab. This immediate view is really needed to make development an efficient process.
(I previously wrote instructions on using Binder and Voilà to share an existing notebook from Github. This is a great solution for sharing a notebook, but way too slow for use while coding.)
For some reason I had a really hard time making this work at first – I got endless 404 errors and never did actually find the problem. I did however find a solution.
I was originally trying to make it work without using a virtual environment. I know all about package management, the reasons for using virtual environment, etc. but sometimes I just like having basic Python packages that I use all the time installed so I can do things like just download and launch a Jupyter notebook without installing numpy and pandas for the 100th time.
When I made a virtual environment and installed the needed packages, everything worked fine.
These instructions show using venv and pip, but you could also use pipenv or conda if you prefer.
Step 1. Setup a virtual environment.
In the project directory run:
virtualenv venv
source venv/bin/activate
Later (don’t do this now) to stop using the virtual environment you can use:
deactivateStep 2. Install packages
Next use pip to install the libraries you need. For this, at a minimum, you need JupyterLab and Voilà:
pip install jupyterlab
pip install voila
The JupyterLab preview extension for Voilà also needs to be installed with:
jupyter labextension install @jupyter-voila/jupyterlab-preview3. Launch Jupyter Lab
jupyter lab4. Render with Voila
In Jupyter Lab go to View -> Render Notebook with Voilà.
Where the Voilà version is displayed you can also select the box that says ‘Render on Save’. Then refreshing it is as easy as Ctrl-S.
5. Make cool stuff!
I see some really interesting applications for this. I watched this video on YouTube about Dashboarding with Jupyter Notebooks, Voilà and Widgets. It’s possible to make one’s own templates and use React or Vue to make a mobile-responsive custom web app this way.
Getting this setup is sort of step 1 for working on learning how to do that.